Sunday, July 10, 2011

Baby Shower!

Baby showers are fun.  I learned  that ladies love to buy baby "stuff".  (I think that Target and Babies R Us need to restock their shelves after yesterday!)  I have never seen so many gifts.  We even had people that could not attend dropping gifts off! 

Through this shower I have been taught a valuable lesson about God's love:
I wanted Ashley's shower to be great. I wanted it to be a beautiful celebration. I wanted a lot of people there.  I wanted her to feel special- because, she is.  Out of the 24 that attended- Ashley only knew about 5 or 6 of the ladies. These amazing ladies showed up with gifts, hugs, words of advice/encouragement and LOVE!  I put a call out to close friends and boy was I surprised (and brought to tears) at the response!  I invited people to attend a party for someone they have never met- and they THANKED me!?!?  That is God's love in action.  I will never find words to describe how amazingly blessed I feel to be surrounded by such selfless love.  So- THANK YOU to all that prayed, drove 2 hours, helped, brought tables,cooked, cleaned, sent gifts, attended, brought gifts, and most importantly- showed Ashley, (and ME) such Christ-like LOVE.  Thank you, thank you, thank you.  Here are some pictures from the party:

This was taken before the party
Here is Mommy-to-be


Side View
Me, Ashley, Traci
Mommy & Daddy (Chris)

 Awe
Let the games begin


 Present Time


 Yes, He will fit in those!

 One of my favorite games: guess how big her tummy is


Oh, Christina!!! You won the game!
 Buffet lunch

So, to Ashley Jackson (baby Zeik) and Chris Santana- God Bless you three!  I love you all.  I will always pray for your family and thank God that He created it.  The shower was the fun, easy stuff- now on to the hard, enjoyable stuff!  Ann

Sunday, June 12, 2011

Sock Monkey Mania!!


I love Sock Monkey's!  They are fun  and easy to make.  Here is a step by step tutorial following my making of a sock monkey.
Supplies needed:

(Stuffing, socks, buttons, heavy thread or embroidery thread, scissors, needles, sewing machine, patience)

  • First, you will need a pair of socks.  They need to be mid calf length, (or longer).  I have found that the heavier winter socks work best for the sock monkey.  (There are websites were you can order the "original" sock monkey sock- they are pricey though- so I stuck with socks purchased from Marshall's).
  • Turn both socks in-side-out.
  • flatten one sock out, with heel down.
  • draw a line, i use sewing chalk, down the center of the sock - drawing away from the heel all of the way to the toe. Start the line about 1" away from the heel.

  • Sew down both sides of the line and connect the stitching at the top of the line (making a "U" shape).  I use the presser foot as a measure for the perfect seam.
  • This is what it will look like after you have sewn both sides of the line.


  • Cut down the center on the line.

  •  Flip the sock right-side-out. Stuff the legs and body.


  • Find the area where you would like your neck to be.
  • With the heavy thread, stitch around the neck area 1/4" spacing all of the way around the body.
  • When finished, pull both ends of the thread tightly and then knot the ends together making a neck.

  •   Now finish  the top of the head.  
  •   There are several ways to close it up. In the pictures I have chosen to leave a "crest or "crown" on my monkey. 
  • Gather the top of the sock up using the same 1/4" stitching as before. 

  •   After cinching the head, stitch closed the left over sock top.  (If making a rounded head, just stuff the head all of the way, cutting off any extra sock, and stitch the sock top flat and round.)


  •  Take the other sock and flatten it, folded in half. 
  • With the sewing chalk, draw your arms, ears, mouth, and tail on the sock.  (on the picture below I mislabeled the arms as "legs"- but, they are ARMS!)


  •  Cut the ears and mouth out of the sock, set them aside. 
  • Using the same guidelines as with the legs, sew around the line for the tail and arms. 
  • Cut them out. 
  • Flip them right side out and stuff them.


  •  Ears: Fold the ear pieces in 1/2 with wrong sides touching. 
  • Begin to sew them shut, leaving a small area open to stuff. 
  • Once stuffed, sew shut and attach to the head of the monkey.
  •   Begin to attach the mouth.  I start by aligning the mouth piece on the face and sewing the top first and leaving a space big enough to stuff the mouth. 
  • Once stuffed, sew the mouth completely on.
  • Now attach the stuffed arms and tail.
  • Add eyes by sewing them or putting on buttons. 
  • You are finished! 
I also made some clothes for my kids monkey's.  I will add instructions on that in my next blog entry.

Sunday, March 20, 2011

Making Applesauce- Yummy!

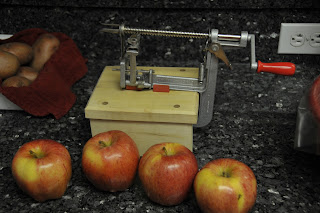
I started with four Fiji apples.  (I would have preferred to use two or three different types- but, all that looked good at Sam's were the Fiji. )
Next I used my Pampered Chef apple peeler/corer.  

It is a real cool kitchen "tool".  The kids love to eat the peeled, sliced and cored apples for snacks.  This made the process a lot quicker than doing it by hand.

Clean up is quick too!  Oh, and the guinea pigs love to eat the scraps.

Next I put the apples in a pot for cooking. 
I used 4 apples, 1/3 cup brown sugar, 1/3 cup sugar, fresh squeezed lemon juice from one lemon, some cinnimon, 1 cup water.  Stir it up and bring to a boil.  Then simmer for about 20-30 minutes. (Until the apples are soft)


Once the apples are cooked, I used a potato masher to puree the apples.


It took me about 5 minutes of "mashing" to get the consistency that I liked.  Then I served it hot.  It was a hit.